
September 25, 2011
file update
i have changed the file format on all the angry birds files from mtc files to svgs so that they can be more diversely used. hope that helps!!
my laundry room curtains
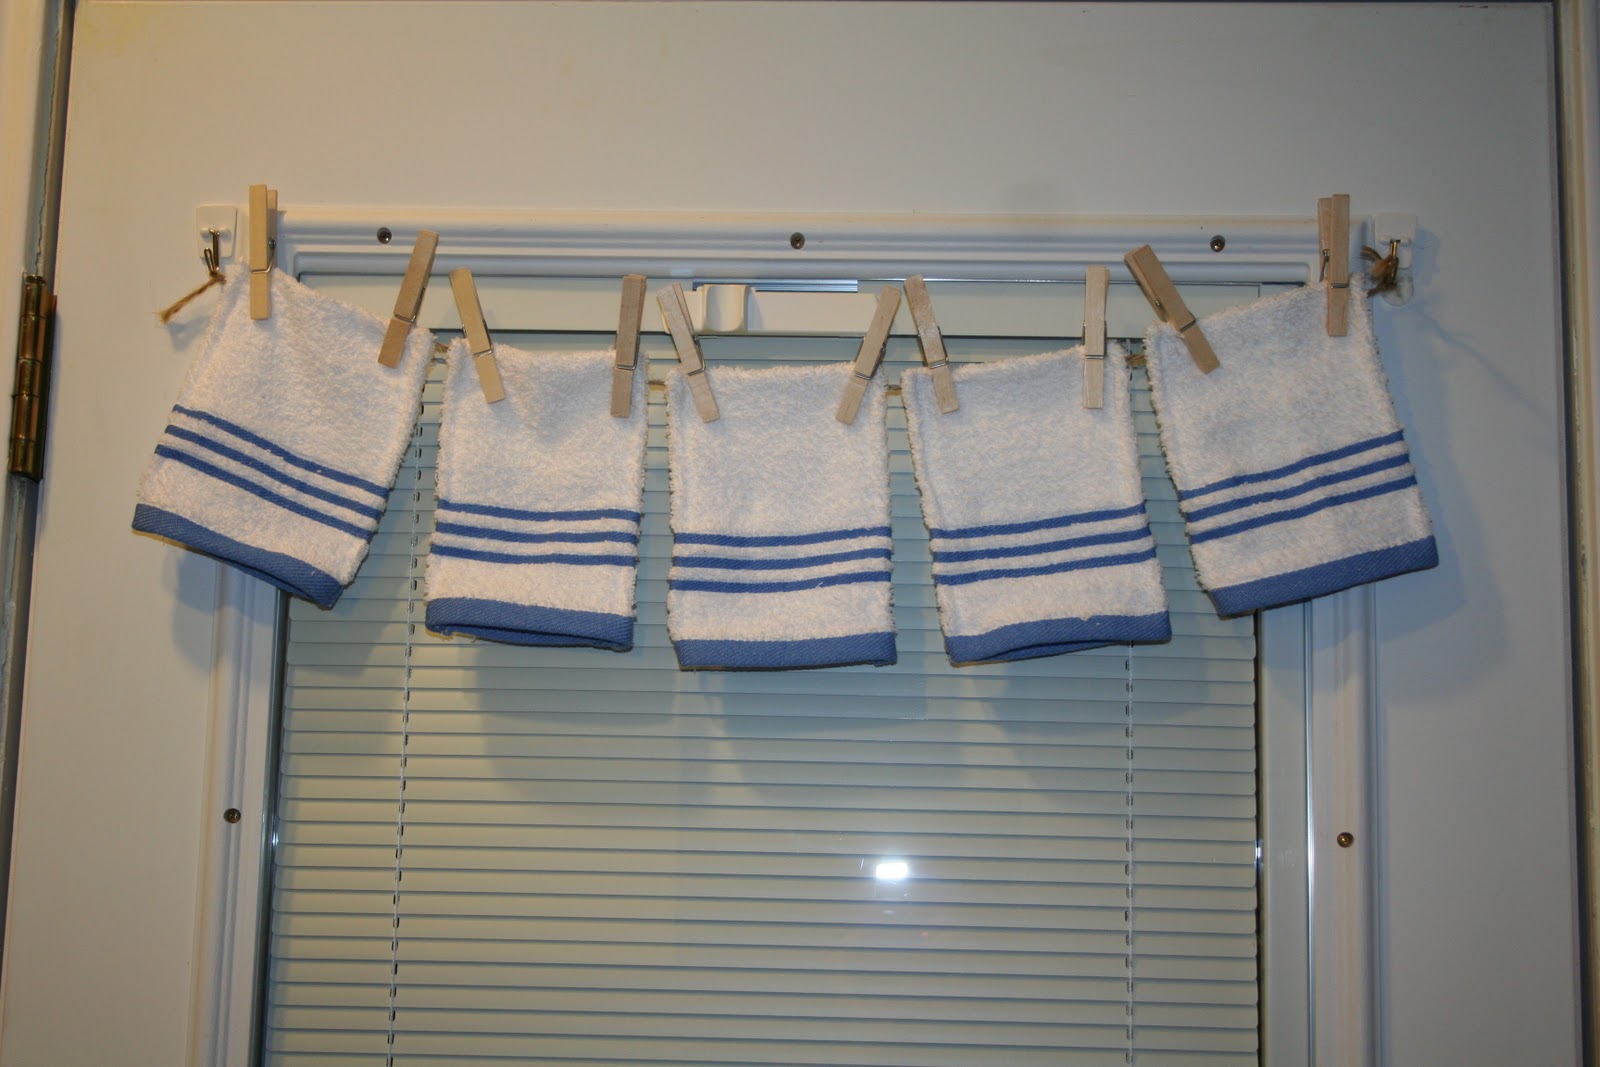
in working on my laundry room redo, i needed some curtains for my window on door. since it's not a standard window i wanted something a little different and matching with my theme. that's when i thought of this idea...

i wanted it to look like laundry hanging out to dry on my window. to do this i found some washcloths at walmart that were cute and went well with my colors AND was on the clearance aisle! to start my project i looked at my window and decided about how big i wanted each washcloth section to be.i figured about half the size of the washcloth would be perfect after considering seam allowance.
first step is to sew one end of the washcloth. make sure to back stitch at the beginning and at the end to prevent unraveling. i did not go all the way thru the blue trim at the end because i was using white thread and didn't want it showing up.

next i found my half way point, made very easy by the fact that i just bought them and the creases from laying folded told me just where to fold. : ) and repeated my sewn edge.

after i completed both edges i cut the other half off so that the back looks like so...

i then repeated these steps for 2 more washcloths. i wanted a total of 6. after my first one was completed i used it as my "official" size. i measured all my remaining ones with that first one to ensure they all were the same size. some i had to go back and trim up after being sewn.

almost done. when i hung it on my twine as a trial run i noticed that the ends where they were i sewed it together causing a bunch at that end.
 i took and cut theses corners at an angle allowing it to lay much flatter.
 now it's time to hang your clothes line! i bought the little 3m hooks since i my curtain was actually on my door. i cleaned my whole door really well before i hung them, with it being our back door and of course the one we use the much, it was VERY dirty. i cleaned the area where i was putting the hooks with rubbing alcohol as suggested on the package and allowed to dry. after it was good and dry and placed my hooks. the instructions recommending leaving up for 1 hr before hang anything on the hooks to allow good adhesion. so i did this step before i did all my sewing so i had plenty of time.
 now you're ready to hand your twine. i just bought the twine in the hardware department for like $1 at walmart...

i stretched the twine across the window leaving it pretty tight. i wanted it to stay tight because i knew the weight of the washcloths would pull it down.

all that is remaining now is to place your washcloths and you're done!!

* an after thought... these have held up extremely well. i just knew using this door so much the weight of the curtains would pull these down but they have with held great! they have been up a couple months now and i'm VERY pleased!
i wanted it to look like laundry hanging out to dry on my window. to do this i found some washcloths at walmart that were cute and went well with my colors AND was on the clearance aisle! to start my project i looked at my window and decided about how big i wanted each washcloth section to be.i figured about half the size of the washcloth would be perfect after considering seam allowance.
first step is to sew one end of the washcloth. make sure to back stitch at the beginning and at the end to prevent unraveling. i did not go all the way thru the blue trim at the end because i was using white thread and didn't want it showing up.

next i found my half way point, made very easy by the fact that i just bought them and the creases from laying folded told me just where to fold. : ) and repeated my sewn edge.

after i completed both edges i cut the other half off so that the back looks like so...

i then repeated these steps for 2 more washcloths. i wanted a total of 6. after my first one was completed i used it as my "official" size. i measured all my remaining ones with that first one to ensure they all were the same size. some i had to go back and trim up after being sewn.

almost done. when i hung it on my twine as a trial run i noticed that the ends where they were i sewed it together causing a bunch at that end.


 now you're ready to hand your twine. i just bought the twine in the hardware department for like $1 at walmart...
i stretched the twine across the window leaving it pretty tight. i wanted it to stay tight because i knew the weight of the washcloths would pull it down.

all that is remaining now is to place your washcloths and you're done!!

* an after thought... these have held up extremely well. i just knew using this door so much the weight of the curtains would pull these down but they have with held great! they have been up a couple months now and i'm VERY pleased!
September 12, 2011
i'm baaaaccccckkkk....
ok finally after weeks of no time to blog i'm back! :) school started and i finally have settled into a routine and now i'm ready to get back to work. so with my first post back from the start of school our prep for school starting....
i found some water bottles at albertson's for $1 a piece and couldn't wait to personalize them!

since maverick's new fav color is blue i gave her the blue one, bayley loves green, and that leaves orange for riley. (sorry riley!) i cut out each kids names out of outdoor vinyl (oracal 651) with MTC and cricut.

after i cut each name out i applied it to the bottle with contact paper...

after taking the contact paper off and finishing the other two i'm done and the kids have their own personalized water bottles!!

July 29, 2011
it's hard being a diva, doggy dress
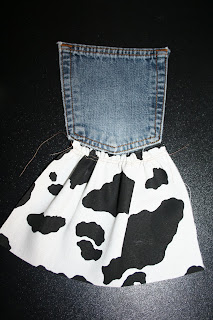
i found this blog and this diy craft and couldn't wait to get started for my favorite little niece hershey and adopted niece diva. the name of the blog is sew doggy style and you can click here to she her post. here's how i made their dresses...

my materials i used was an old jean pocket, some cow print material, some pink tulle, black ribbon (i ended up not actually using the black ribbon but just the pink instead.) and some hot pink ribbon. the first step is to gather your material to fit the pocket. in order to do this you need to cut your material about 2 and 1/2 times larger than your finished result.

i measured from here to here and got 4 in. so i cut my material 10 in. from here you have to gather your material to do this you will need to a 1/2 in seam across the top leaving a good amount of string on either end. very import not to back stick here...


after you have your 1/2 in seam time to sew a 1/4 in seam across the top as well, and again to do not back stitch on either end. once you have both seams sewn, tie one end of the strings together to keep from pulling the thread out. with the other end pull the top string along, much like you would a curtain rod, and bunch or gather the material.

the next step you will need to do is hem the edges to prevent raveling. before you sew the edges line up your gathered material to your pocket to assure it's the right size.
 i pressed the edges first...
 and then sewed a 1/4 in seam..
 then repeat for the bottom edge. when finished the back should look like this...
next do the same thing with tulle. be careful with the tulle, it is delicate and will rip easily. the tulle doesn't need to be hemmed just gathered.

after i lined up the tulle and cow print

i placed the pocket on top and then sewed the three pieces together. i used thread about the same color as the thread used on the pocket, a light brown color.

after the three pieces are sewn together the dress comes together like so...

after the top of the dress is together it's time to make the body of the dress. to do this you will need to measure around body of your dog to determine the size of material to cut. i used scraps from an old shirt i used with another project. i like the t shirt material because it stretches.

after you cut your material it's time to sew it onto the pocket

i placed it on the pocket down from the top seam some. i sewed one side and then the next.

next i cut the ribbon to attach for around the neck.

i sewed the ribbon to the top and the dress is done. well..... ok it's done unless you like me need some need some bling! :)

i had to make a diva dress for my favorite little diva so that's what i did. i cut my words and shadow out of HTV on make the cut then placed them onto the pocket.


after cutting out the shadow layer and the top layer it's time to iron it on. place the shadow layer down and something on top to protect from heat such as a teflon sheet. iron about 8-10 sec.


pull the off the shinny top layer of the HTV and re-iron the HTV with the protective layer. after you have re-ironed line up your top layer repeat the process.

NOW it's time for the bling!! :)

i use fabric glue to place my stones.

and after you add the bling.... ta da you're done! :)

 baby girl diva...
 and sweet hershey...

my materials i used was an old jean pocket, some cow print material, some pink tulle, black ribbon (i ended up not actually using the black ribbon but just the pink instead.) and some hot pink ribbon. the first step is to gather your material to fit the pocket. in order to do this you need to cut your material about 2 and 1/2 times larger than your finished result.

i measured from here to here and got 4 in. so i cut my material 10 in. from here you have to gather your material to do this you will need to a 1/2 in seam across the top leaving a good amount of string on either end. very import not to back stick here...


after you have your 1/2 in seam time to sew a 1/4 in seam across the top as well, and again to do not back stitch on either end. once you have both seams sewn, tie one end of the strings together to keep from pulling the thread out. with the other end pull the top string along, much like you would a curtain rod, and bunch or gather the material.

the next step you will need to do is hem the edges to prevent raveling. before you sew the edges line up your gathered material to your pocket to assure it's the right size.


next do the same thing with tulle. be careful with the tulle, it is delicate and will rip easily. the tulle doesn't need to be hemmed just gathered.

after i lined up the tulle and cow print

i placed the pocket on top and then sewed the three pieces together. i used thread about the same color as the thread used on the pocket, a light brown color.

after the three pieces are sewn together the dress comes together like so...

after the top of the dress is together it's time to make the body of the dress. to do this you will need to measure around body of your dog to determine the size of material to cut. i used scraps from an old shirt i used with another project. i like the t shirt material because it stretches.

after you cut your material it's time to sew it onto the pocket

i placed it on the pocket down from the top seam some. i sewed one side and then the next.

next i cut the ribbon to attach for around the neck.

i sewed the ribbon to the top and the dress is done. well..... ok it's done unless you like me need some need some bling! :)

i had to make a diva dress for my favorite little diva so that's what i did. i cut my words and shadow out of HTV on make the cut then placed them onto the pocket.


after cutting out the shadow layer and the top layer it's time to iron it on. place the shadow layer down and something on top to protect from heat such as a teflon sheet. iron about 8-10 sec.


pull the off the shinny top layer of the HTV and re-iron the HTV with the protective layer. after you have re-ironed line up your top layer repeat the process.

NOW it's time for the bling!! :)

i use fabric glue to place my stones.

and after you add the bling.... ta da you're done! :)

 baby girl diva...
 and sweet hershey...
July 24, 2011
canvas art
i got an idea to make another canvas like i did mav's...

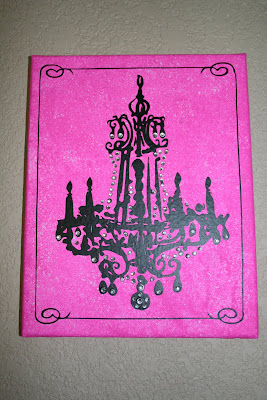
i got the idea for this from jin at underacherrytree.com. (canvas tutorial) this time i wanted to add some bling. i was inspired by my friend priscilla's daughter's room. she has a paris theme room all pink and black with the eiffel tower everywhere. so i wanted to make a canvas with a chandelier silhouette and of course some bling.

so i started with my materials.. i got a canvas and some acrylic paint and some rhinestones and cement to glue them to the canvas. courtney's walls are already pink but i wanted a pink background so i decided to sponge paint the canvas to give it some texture to make it stand out against her walls.

i used a regular sponge and dabbed the paint onto the canvas. now on my canvas for mav i used contact paper and cut out the outline of the different parts and used it as a stencil. but with this one because i wanted a chandelier and because the one i chose was pretty detailed i decide just to cut the design out of black vinyl and place that onto the canvas instead.

after i got the vinyl on the canvas i used the cement glue and placed the rhinestones over the beaded areas on the image. here's the finished result...

July 22, 2011
miss d...
i made maverick my own miss me jeans, i call them miss d! (hehehe) any ways here's her pants before some bling...


and then for the bling...


and then for the bling...


Subscribe to:
Posts (Atom)